At a glance
- Consider chroma sampling and bit depth separately.
- Check Log conversion and where LUTs are applied; avoid applying the same conversion twice.
- Check the camera's RAW recording/output support, then test compatible software, export after reopening, and storage.
After picture detail, frame rate, exposure, and storage, consider how the colors and brightness you capture are stored as data. 4:2:2, 10bit, Log, and RAW are different items, so I will consider them one by one instead of grouping them together as “high-quality settings”.
Read 4:2:2 as “four-two-two”
Video may be recorded with brightness information separated from information describing color differences. The brightness information is called luma, and the color-difference information is called chroma. Read 4:2:2 as “four-two-two” and 4:2:0 as “four-two-zero”. These numbers indicate how much chroma detail is retained relative to luma.
In basic terms, 4:2:2 halves the horizontal chroma resolution without reducing it vertically. 4:2:0 halves it both horizontally and vertically. In the diagram's area of 4 pixels across × 2 pixels high, luma has 8 samples; each chroma component has 4 samples in 4:2:2 and 2 samples in 4:2:0. A sample is a unit in which information is recorded.
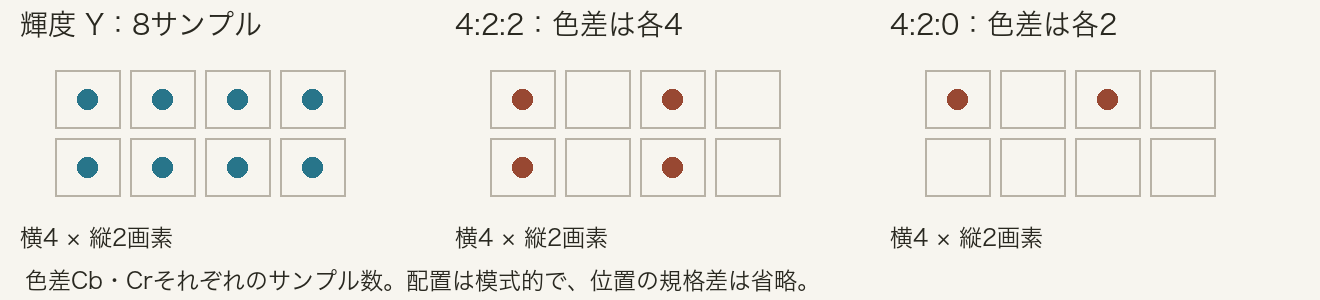
Reading the diagram in English
- Each grid
- A block of 4 pixels across × 2 pixels high.
- Left — luminance Y
- 8 samples of brightness information.
- Middle — 4:2:2
- 4 samples for Cb and 4 samples for Cr, the two color-difference components.
- Right — 4:2:0
- 2 samples for Cb and 2 samples for Cr.
- Sample positions
- The layout is schematic. Differences in sample positioning between standards are omitted.
Retaining more chroma detail can help with compositing that removes a background color or with fine color adjustments. Choosing 4:2:2 alone does not improve focus or brightness, though. Consider both the editing you need and whether your own computer can handle it.
8bit and 10bit describe the fineness of the levels
bit is the unit introduced in the storage article. Here it relates to how many numerical levels represent one component of brightness or color. 8bit offers 256 values; 10bit offers 1,024, so 10bit allows finer levels to be recorded. This affects how much room there is to adjust brightness and color later, but does not mean that 10bit makes every adjustment possible.
This table scrolls horizontally. Swipe left or right, or focus the table and use the Left Arrow, Right Arrow, Home, and End keys to move through it.
| Setting | What it describes | What to check |
|---|---|---|
| 4:2:2/4:2:0 | How much chroma detail is retained | Whether it is needed for compositing or color adjustment |
| 8bit/10bit | The numerical levels representing one component | Adjustment room and computer compatibility |
Converting 8bit to 10bit or 4:2:0 to 4:2:2 later cannot fully recover information that was not recorded during shooting. Think about the editing the finished video will need before you shoot.
For RAW, check the whole finishing environment
A camera processes information received by its sensor to create video. RAW video is a recording format for working with that sensor-derived information during finishing. However, RAW does not necessarily mean uncompressed or completely unprocessed: the information stored and the processing involved differ by format.
For the original α1 that I own, the official guide for Ver.2 and later says RAW video cannot be recorded to the camera's internal memory card, but RAW can be output over HDMI to compatible external equipment. HDMI is a connection for sending video and other signals to external equipment. This does not mean that the α1 cannot handle RAW video. Check internal card recording and external output separately for your own model.
If you use RAW, test whether compatible software can take you through importing, adjustment, export, and storage. You do not need to treat RAW as a requirement from the outset.
Separate the roles of Log and LUTs too
Log is a method for recording a range of brightness, rather than the name of a shared compression format. Straight out of the camera, it can look lower in contrast and less saturated than ordinary footage. Finishing requires color transforms and adjustments suited to the Log used for recording.
Exposure, meaning how you set the brightness of the picture, differs by camera and type of Log. I do not use a blanket rule of shooting every Log brighter.
A LUT, pronounced “lut”, is a lookup table that maps color and brightness values to other values. It may be used only to make the monitoring image easier to view while shooting, or it may be applied to the recorded footage. Check which your camera does. Including automatic transforms in editing software, take care not to apply the same technical transform twice.
Start by finishing a short video and checking color, noise, playback, and export time. Log and RAW are options to add when you need the workflow they involve.
Smooth gradients in skies or walls may show banding, including when strongly adjusting 8-bit Log footage. One practical trial is to record about a minute with the actual settings and compare the finished files. A minute is a test example. A display or delivery file may not reproduce all the information recorded at capture.
For Log, use the exposure tools available on the equipment, such as a waveform showing brightness distribution, zebras marking areas near clipping, or a histogram, and record the Log curve and color gamut. A LUT cannot restore clipped highlights, lost shadow detail or missed focus. A creative LUT may not provide the correct technical conversion. Open the export outside the editor as well.
Developing RAW involves deciding brightness, color, contrast, noise and detail, then exporting a finished video that can be played normally. After saving, close the software and reopen the same material and settings, and export it through to completion. Keep the camera settings, recording format, software version and color settings with the result. Consider future software compatibility when deciding which source files, settings and finished videos to retain.
RAW cannot recover unrecorded highlight detail, missed focus, unwanted motion blur or a moment not captured. Finish the same scene in RAW and a compressed format, then compare time and cost. A storage arrangement with the source plus two copies requires three times the source capacity.
References
Microsoft / Chroma subsampling (opens in a new tab)
Sony / α1 color information and bit depth (opens in a new tab)
Sony / α1 internal video formats (opens in a new tab)
Sony / α1 HDMI RAW output and card-recording limitations (opens in a new tab)
Sony / Log shooting guide (opens in a new tab)
Official documentation / Blackmagic RAW format and processing (opens in a new tab)
Sony / Example of a monitoring LUT (opens in a new tab)
Sony / Example of a setting that applies a LUT to the recording (opens in a new tab)
Checklist for this article
Use the checks as a working note while this page is open.